Downloading your historical data from MYOB AccountRight
Getting started with new systems is always tricky, we know! This is why we have created this quick guide on preparing your historical data. Please set aside 10-15 minutes to get through it. And remember – this only has to be done once – participating in KPI Works in subsequent months takes mere minutes.
By uploading this historical data into your KPI Works dashboard, you’ll be able to see the trends that have been taking place within your organisation – and within your wider industry – right away. Also, some KPIs that we show you (e.g. insurance spend as a % of revenue) can only be calculated on an annualised basis – which is the second reason we ask for this historical data upfront.
Let’s get started!
Skip to:
- Historical Profit and Loss
- Historical Balance Sheet
- Historical invoice count
- Why we ask for historical data
Historical Profit and Loss
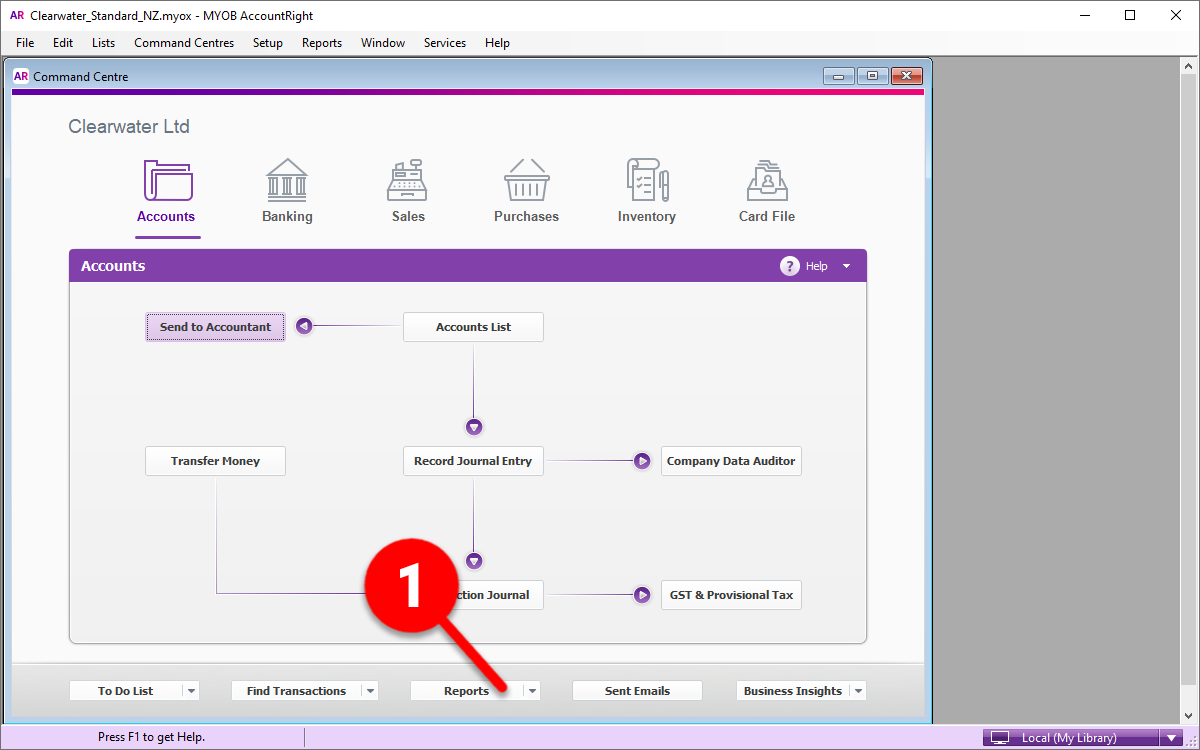
Once you’ve opened MYOB AccountRight, click on the Reports tab at the bottom of your Command Centre (1)
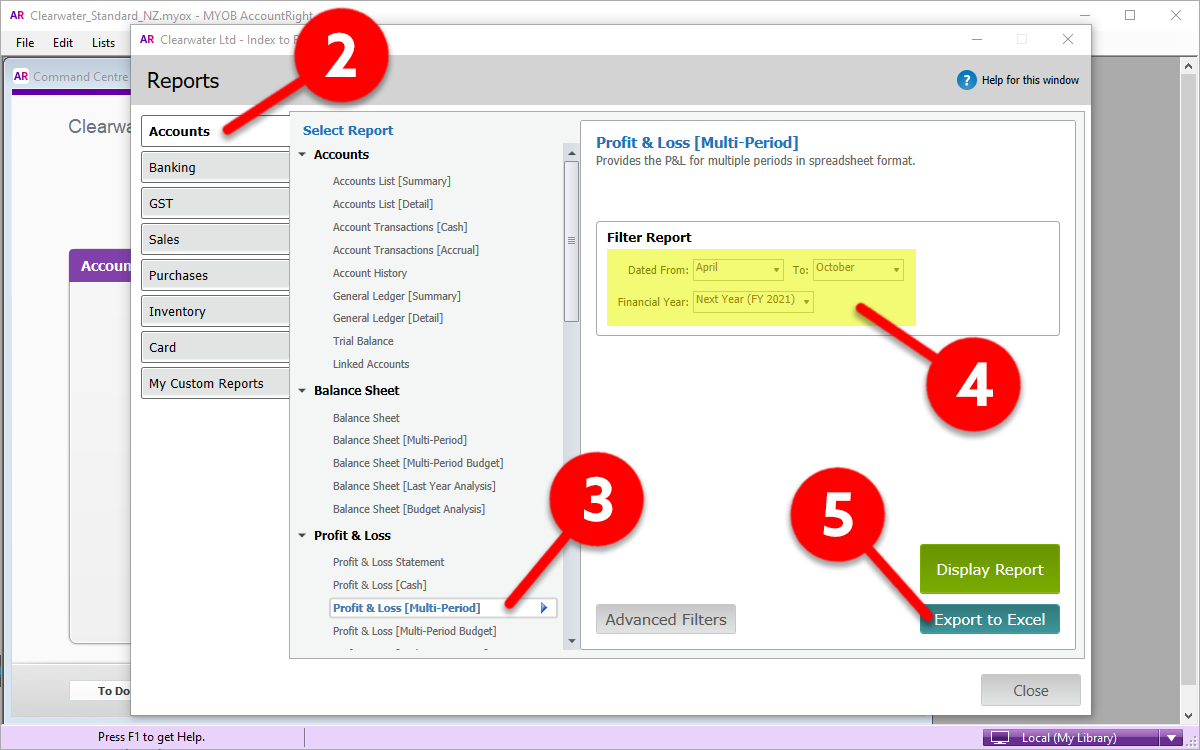
In the Accounts tab (2), scroll down to the Profit & Loss section and click on the Profit & Loss [Multi-Period] report (3). Because MYOB AccountRight forces multi-period selections within a single Financial Year only, you may need to repeat the next step twice in order to get 12 months worth of data. In the Filter Report box (4):
- Select a current Financial Year that has the current month in it (even though it may be called “Next Year” in MYOB)
- Set the “Dated From” window to the first month of the Financial Year
- Set the “To” window to the previous month (e.g. if it’s now November, choose October)
Then, click the dark green Export to Excel button (5)
The sample below contains no data, but for your export, you should see a similar Excel file (6). Please save this file to your computer, specifying the months in the file name (e.g. pl1 April-October 2020.xls). You will end up with a few files, so good naming convention will help you with finding the right files easily.

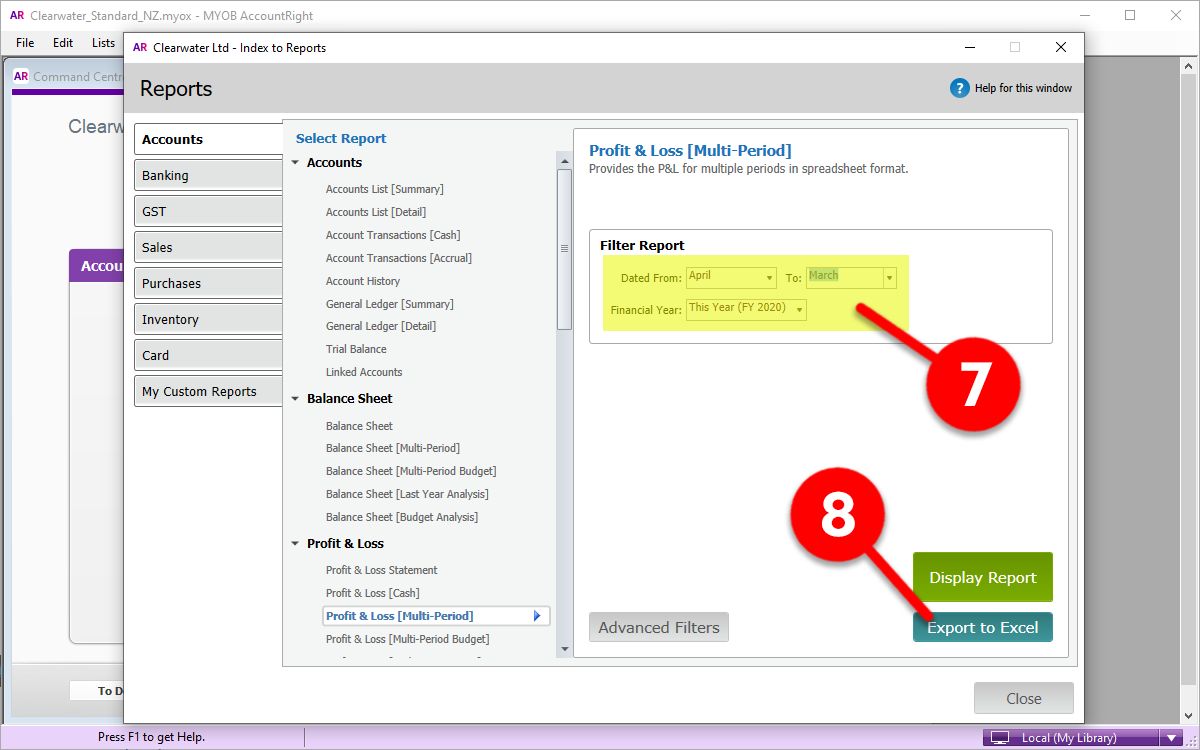
Once you have saved and closed the first Excel P&L file, it’s time to repeat the process for the financial year that has already ended. Back in MYOB AccountRight, in the Filter Report box (7):
- Select the previous Financial Year that has already ended (even though it may be called “This Year” in MYOB)
- Set the “Dated From” window to the first month of the Financial Year (e.g. April)
- Set the “To” window to the last month of the Financial Year (e.g. March)
Then, once again, click the dark green Export to Excel button (8)
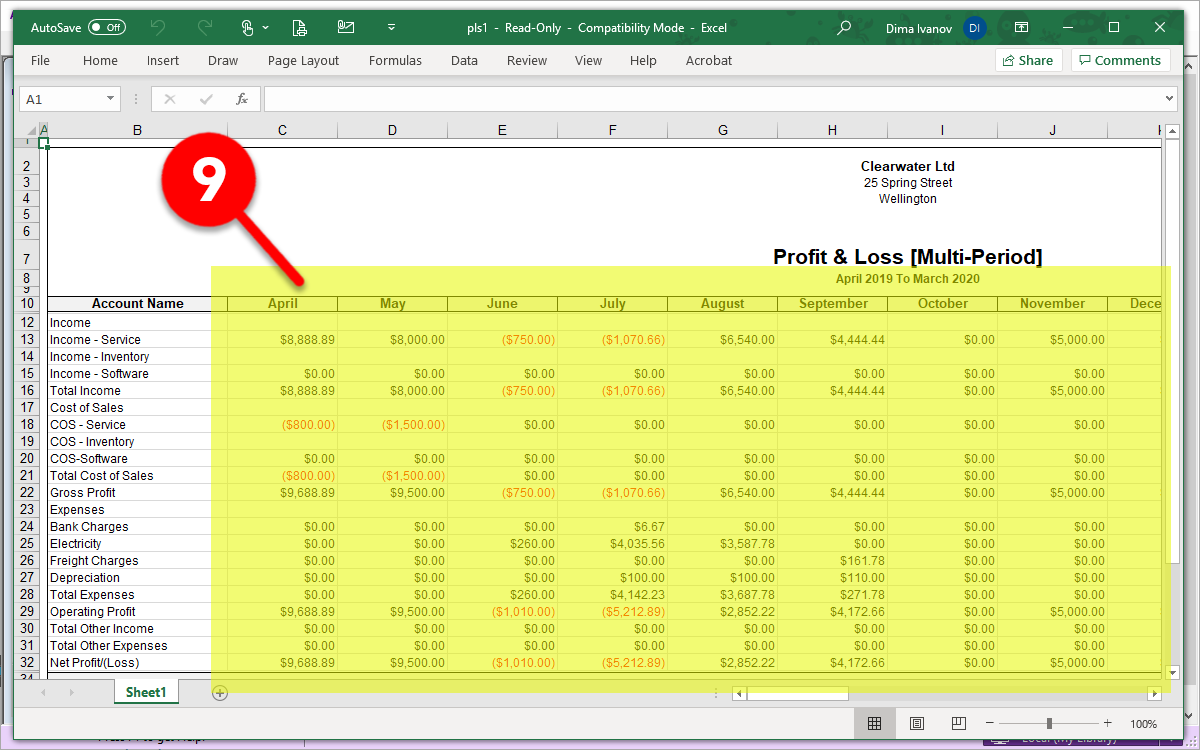
Below is a sample of a full-12-months worth of data exported to Excel (9) – as with the first P&L file, save this file to your computer, adjusting the file name to reflect the correct date range (e.g. pl1 April 2019 – March 2020.xls). Because your historical financial data will be split across two sets of files (one for the current financial year, and one for the previous) you’ll simply need to repeat the data upload process inside KPI Works twice.
Feel free to click here to download a sample file to see if yours looks similar.
Historical Balance Sheet
Once you’ve opened MYOB AccountRight, click on the Reports tab at the bottom of your Command Centre (1)

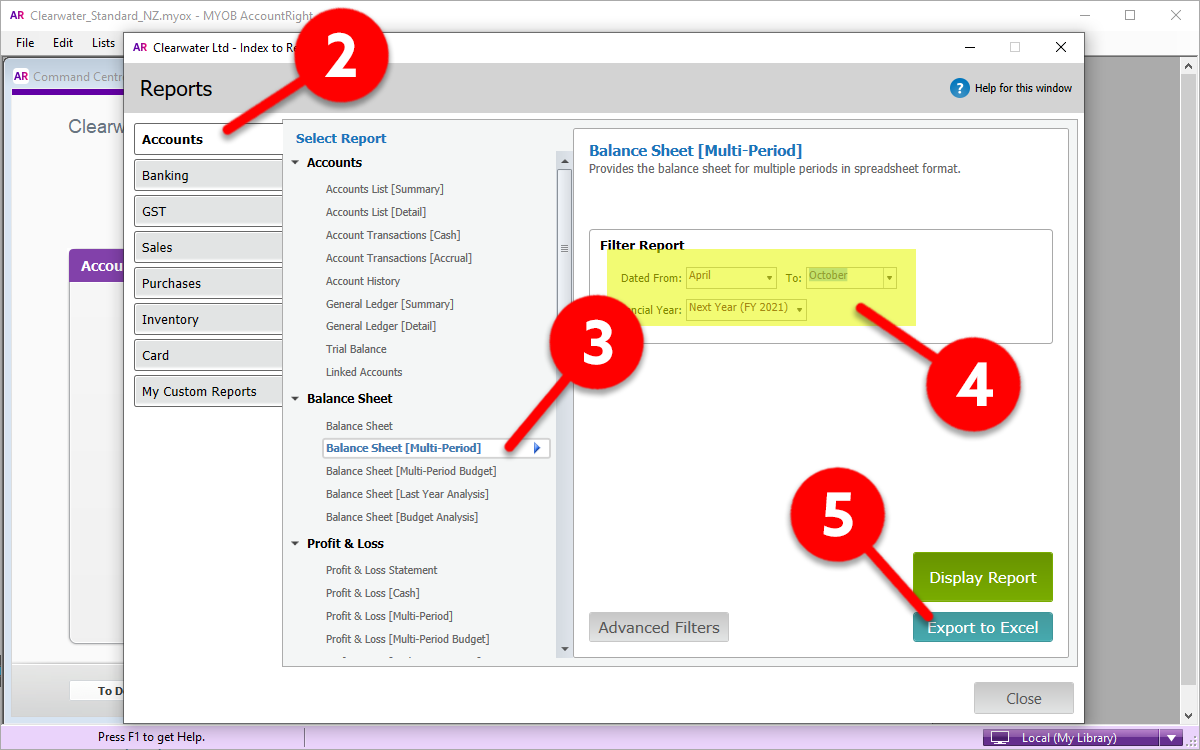
In the Accounts tab (2), scroll down to the Balance Sheet section and click on the Balance Sheet [Multi-Period] report (3). Because MYOB AccountRight forces multi-period selections within a single Financial Year only, you may need to repeat the next step twice in order to get 12 months worth of data. In the Filter Report box (4):
- Select a current Financial Year that has the current month in it (even though it may be called “Next Year” in MYOB)
- Set the “Dated From” window to the first month of the Financial Year
- Set the “To” window to the previous month (e.g. if it’s now November, choose October)
Then, click the dark green Export to Excel button (5)
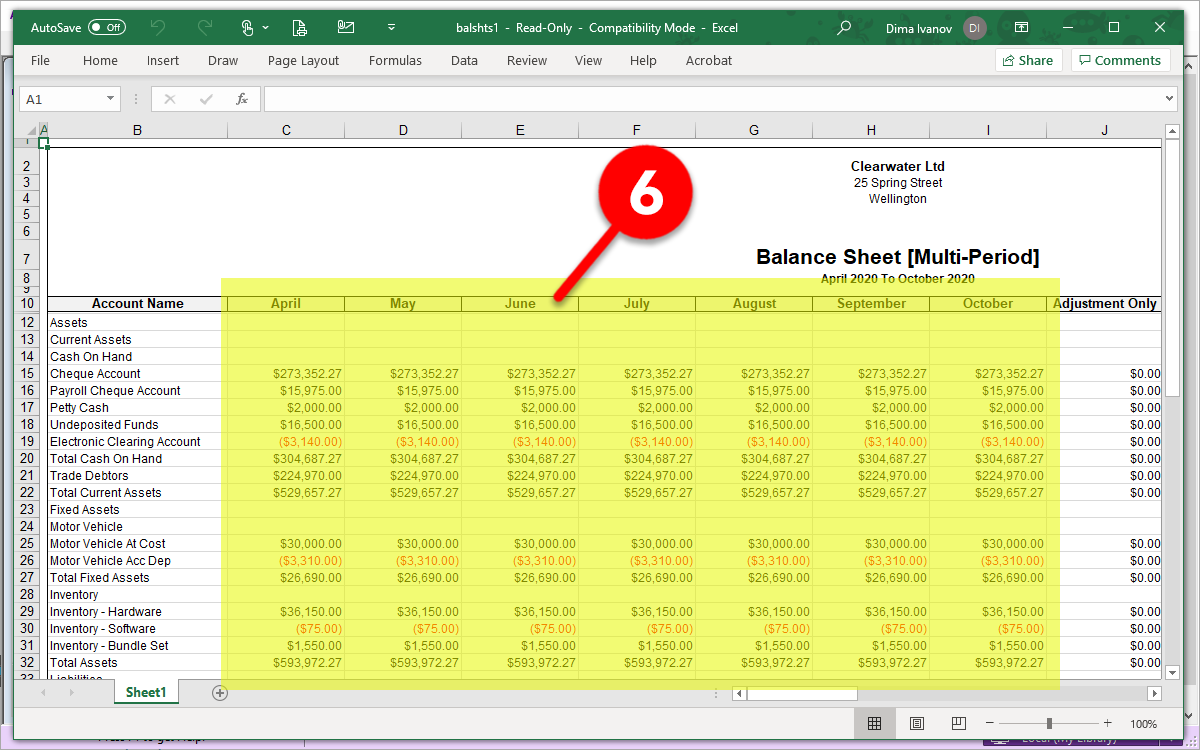
For your export, you should see a similar Excel file (6). Please save this file to your computer, specifying the months in the file name (e.g. balsht1 April-October 2020.xls). You will end up with a few files, so good naming convention will help you with finding the right files easily.
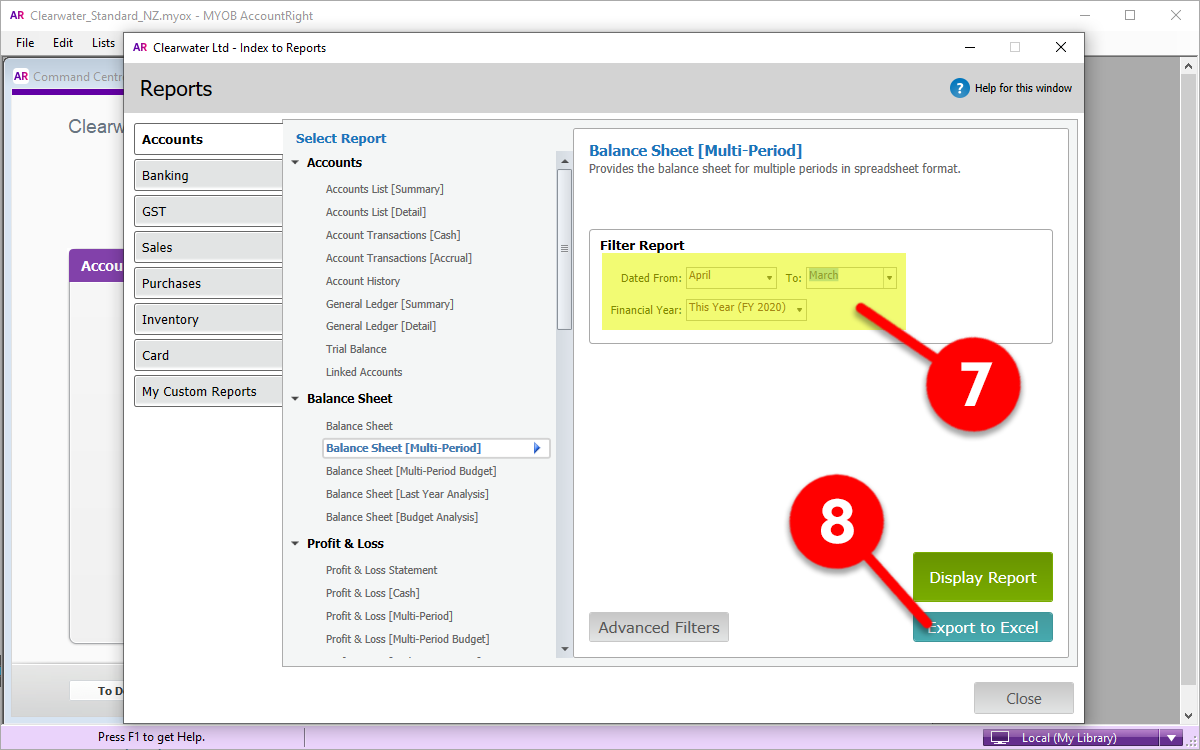
Once you have saved and closed the first Excel Balance Sheet file, it’s time to repeat the process for the financial year that has already ended. Back in MYOB AccountRight, in the Filter Report box (7):
- Select the previous Financial Year that has already ended (even though it may be called “This Year” in MYOB)
- Set the “Dated From” window to the first month of the Financial Year (e.g. April)
- Set the “To” window to the last month of the Financial Year (e.g. March)
Then, once again, click the dark green Export to Excel button (8)
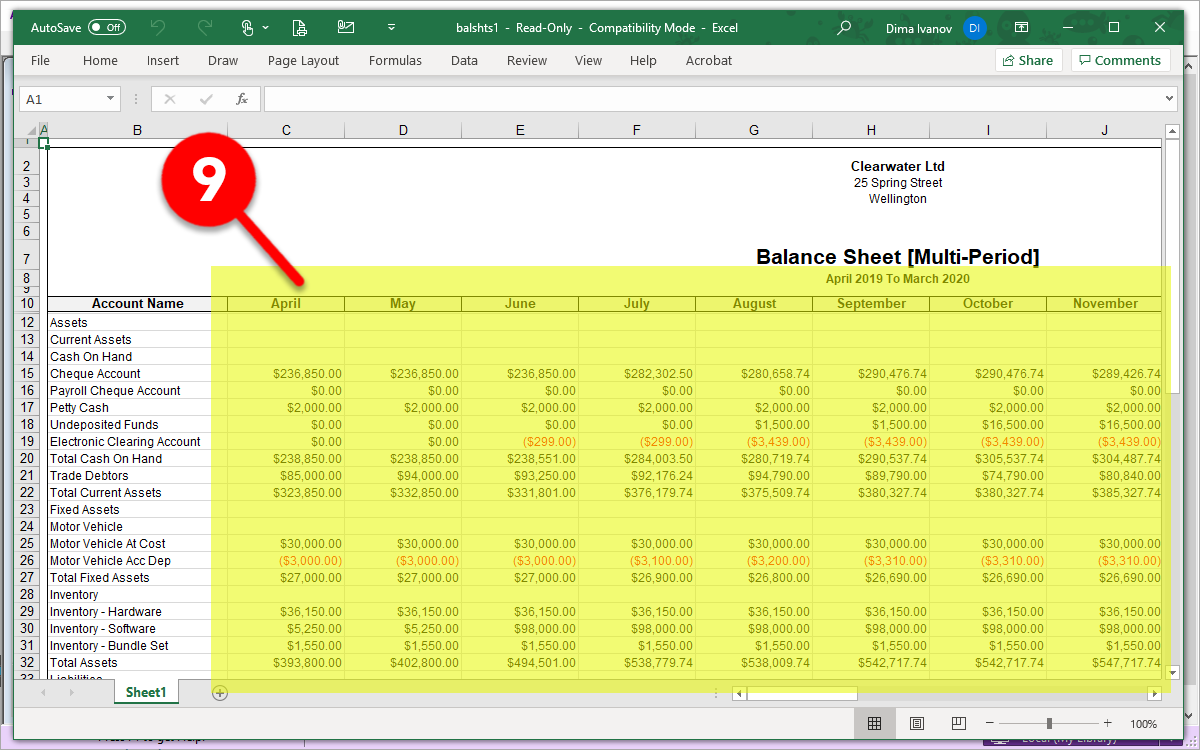
Below is a sample of a full-12-months worth of data exported to Excel (9) – as with the first Balance Sheet file, save this file to your computer, adjusting the file name to reflect the correct date range (e.g. balsht1 April 2019 – March 2020.xls). Because your historical financial data will be split across two sets of files (one for the current financial year, and one for the previous) you’ll simply need to repeat the data upload process inside KPI Works twice.
Feel free to click here to download a sample file to see if yours looks similar.
Historical invoice count
Download our invoice-counter template, and follow the sequence below to export your invoices from MYOB AccountRight, and easily count how many invoices you raised for each historical month.
Once you’ve opened MYOB AccountRight, click on the Reports tab at the bottom of your Command Centre (1)

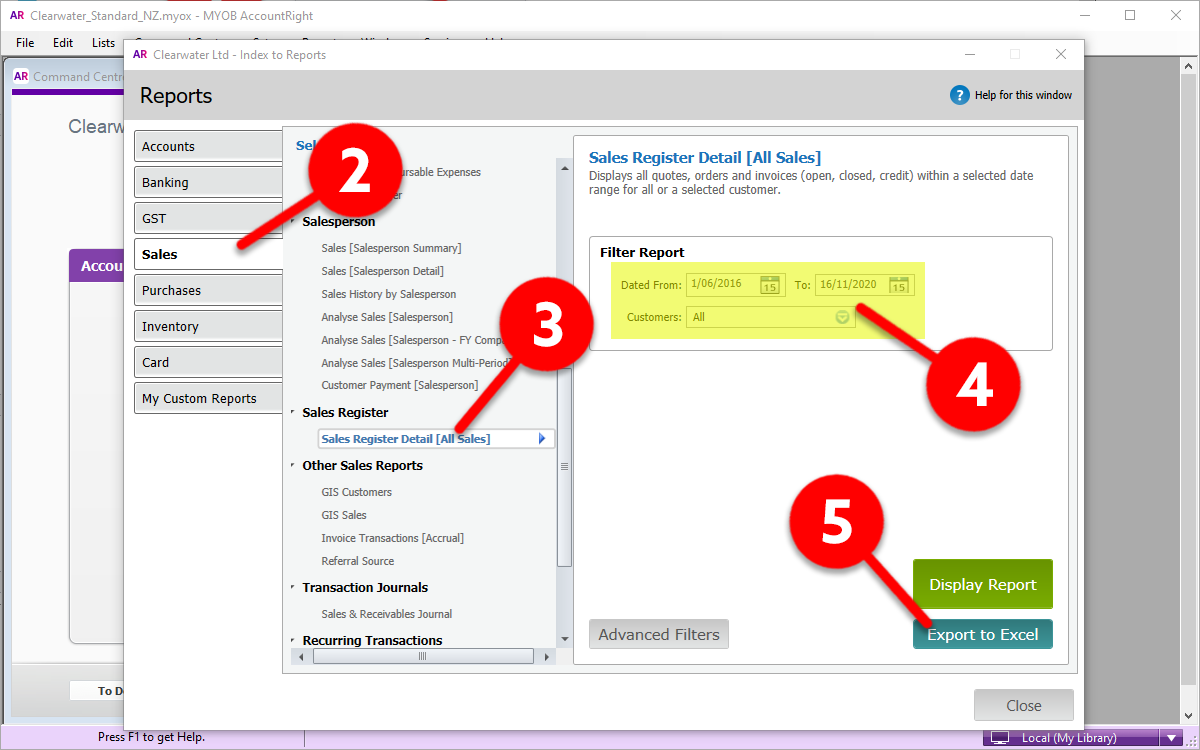
In the Sales tab (2), scroll down to the Sales Register section and click on the Sales Register Detail [All Sales] report (3). In the Filter Report box (4), set the Dated From and To options to match the Profit and Loss, and the Balance Sheet data you have already downloaded and click the Export to Excel button (5) at the bottom.
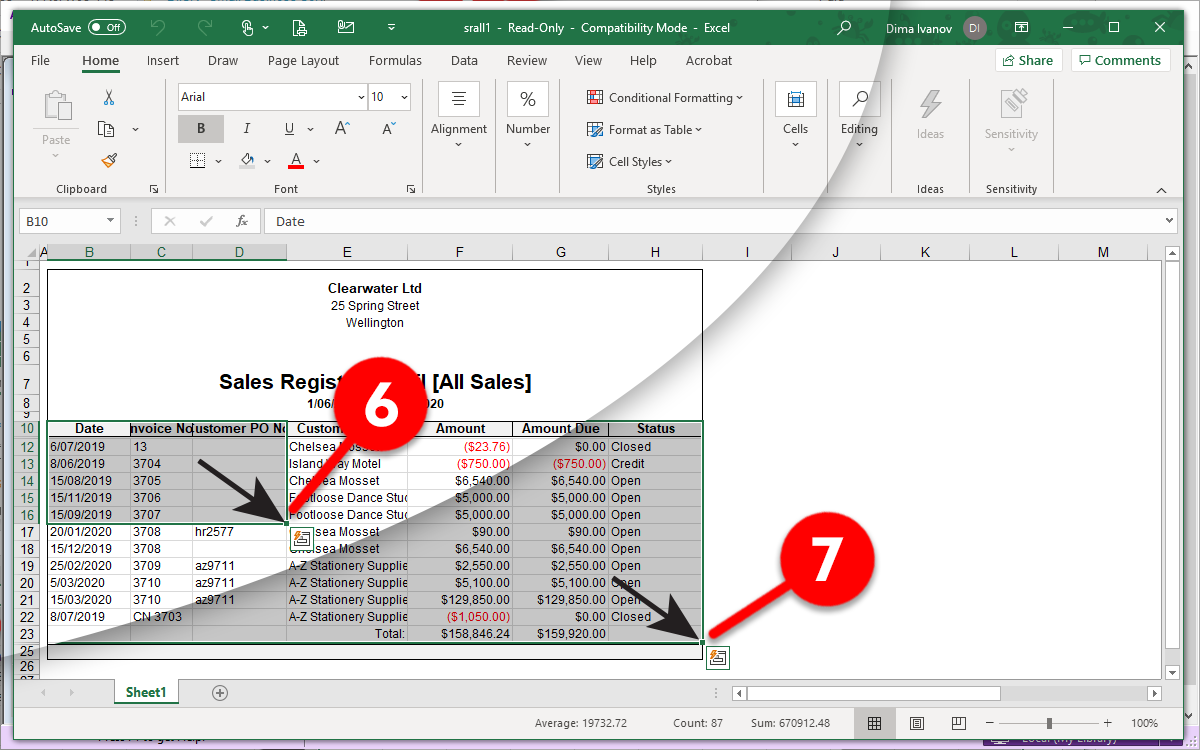
Select all of the invoice data in the exported MYOB file by clicking and dragging, and “copying” the data once highlighted (right-click and “copy”, or, Ctrl+C). Start in the first top-left cell with “Date” in it (6) and end in the very bottom-right cell (7)
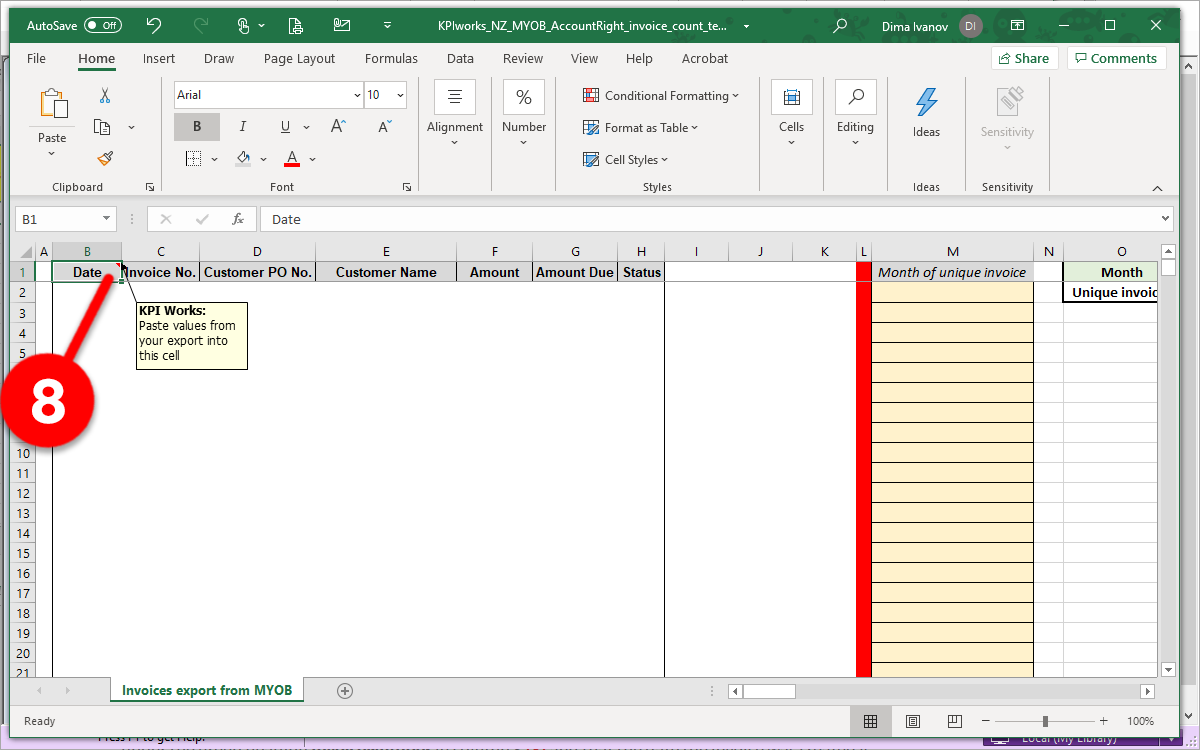
In our invoice-counter template, paste (right-click and “Paste”, or, Ctrl+V) the invoice data into the top-left cell called “Date” (8)
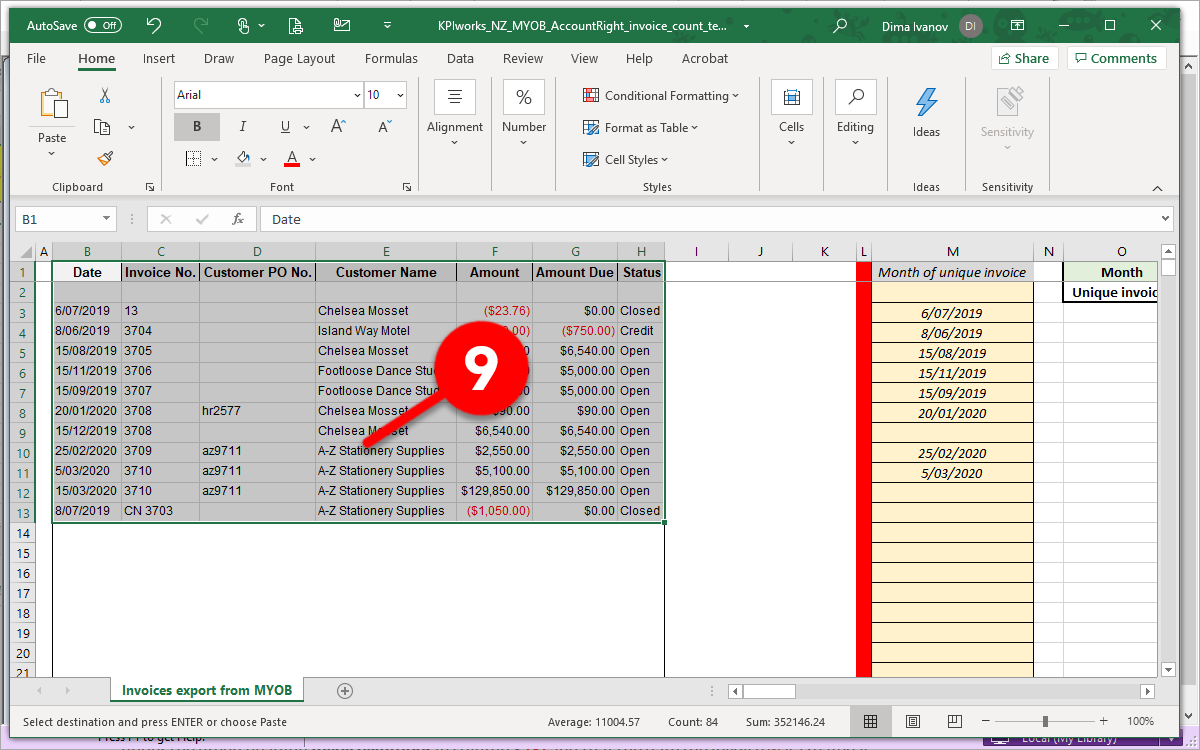
Once pasted, the data will fill the columns (9). Please double-check that your invoice numbers are under the grey heading Invoice No. in column C and that the date the invoice was created is under the grey heading Date in Column B.
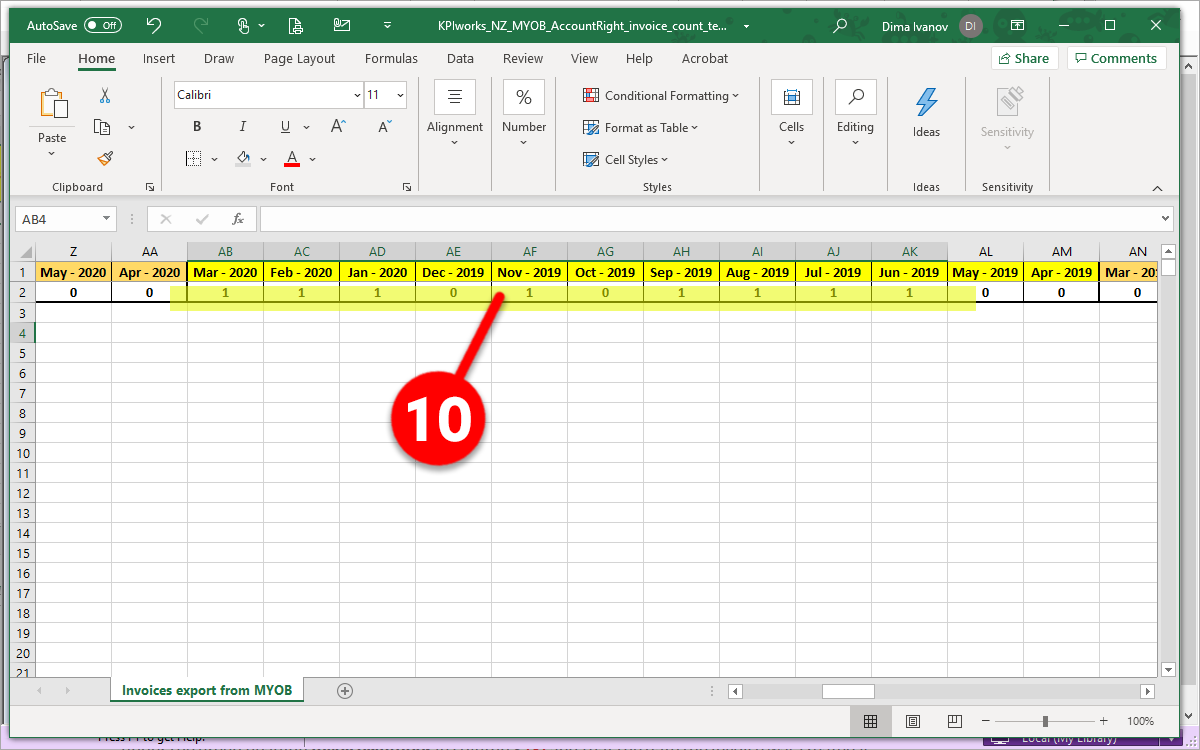
Finally, scroll to the right – and you will see the Invoice count by month that you need for KPI Works in row 2 (10)
Why we ask for historical data
Just in case you’re curious about “Why do you guys ask for our historical data?”, please watch this short 1-minute video:

