
Downloading your historical data from Accredo
Getting started with new systems is always tricky, we know! This is why we have created this quick guide on preparing your historical data. Please set aside 10-15 minutes to get through it. And remember – this only has to be done once – participating in KPI Works in subsequent months takes mere minutes.
By uploading this historical data into your KPI Works dashboard, you’ll be able to see the trends that have been taking place within your organisation – and within your wider industry – right away. Also, some KPIs that we show you (e.g. insurance spend as a % of revenue) can only be calculated on an annualised basis – which is the second reason we ask for this historical data upfront.
Let’s get started!
Some notes before you begin:
- We were told by Accredo that their software is often customised – in which case, you may need to adjust the below process to suit your customisation.
- If you are using the Saturn version of Accredo, you’ll need to adjust the process below to reflect how you want to report on your multiple branches and/or departments.
Skip to:
- Historical Profit and Loss
- Historical Balance Sheet
- Historical invoice count
- Why we ask for historical data
Historical Profit and Loss
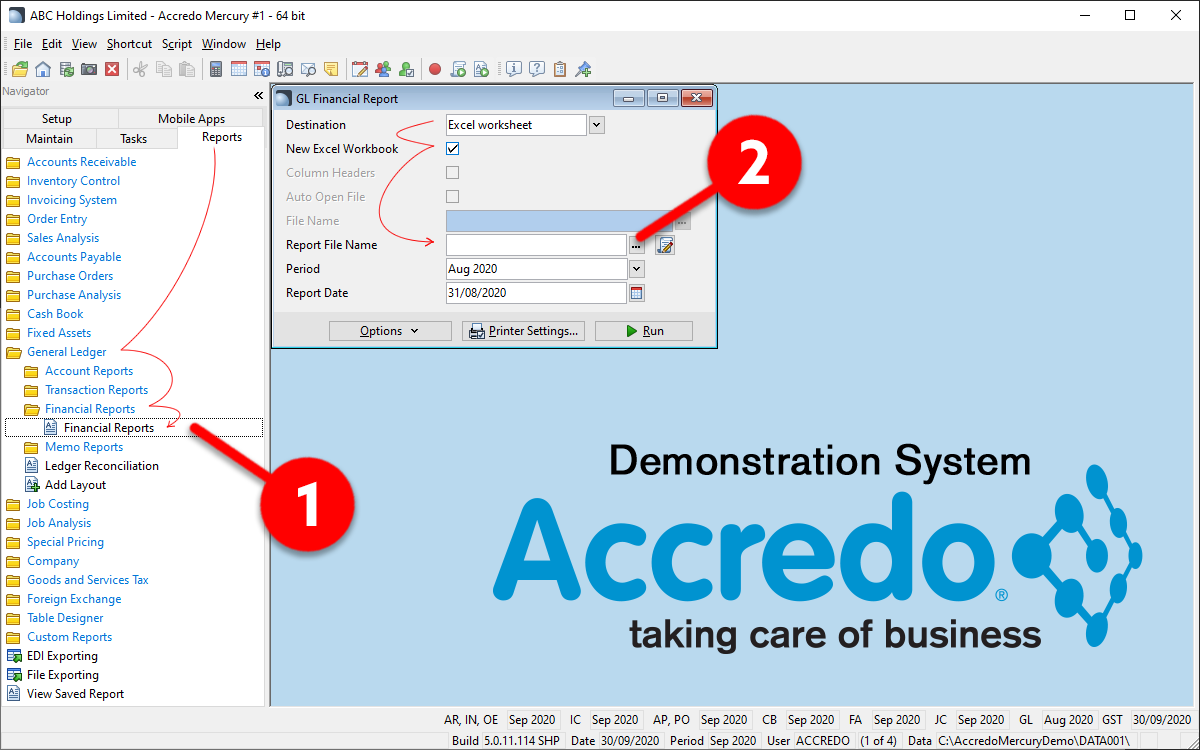
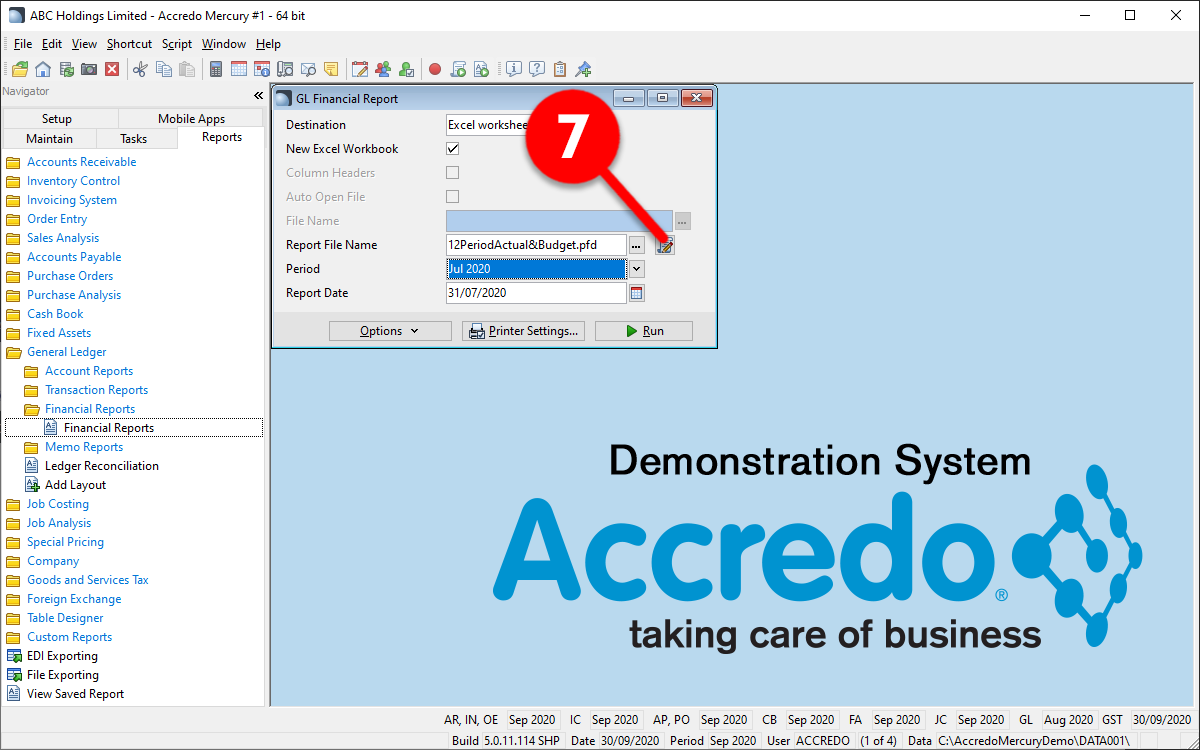
Once you’ve launched Accredo, click on the Reports tab, open the General Ledger folder, open the Financial Reports folder, and click on the Financial Reports screen (1). Once the GL Financial Report screen appears, select Excel worksheet in the top drop-down, check the New Excel Workbook option, and next to the Report File Name, click on the button with […] (2)
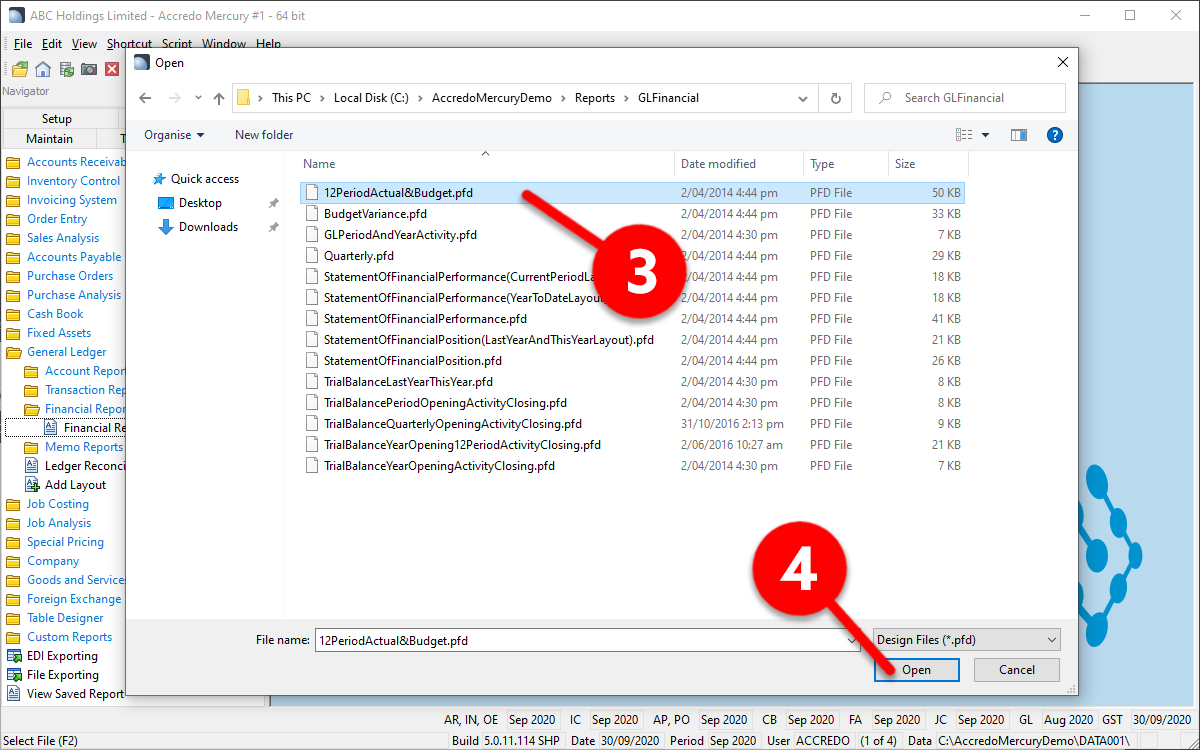
You may not have this exact option, but basically, you are looking for a report file that outputs 12 months worth of data. In our screenshot below, we can see the 12PeriodActual&Budget.pfd report (3). We select it, and click Open (4)
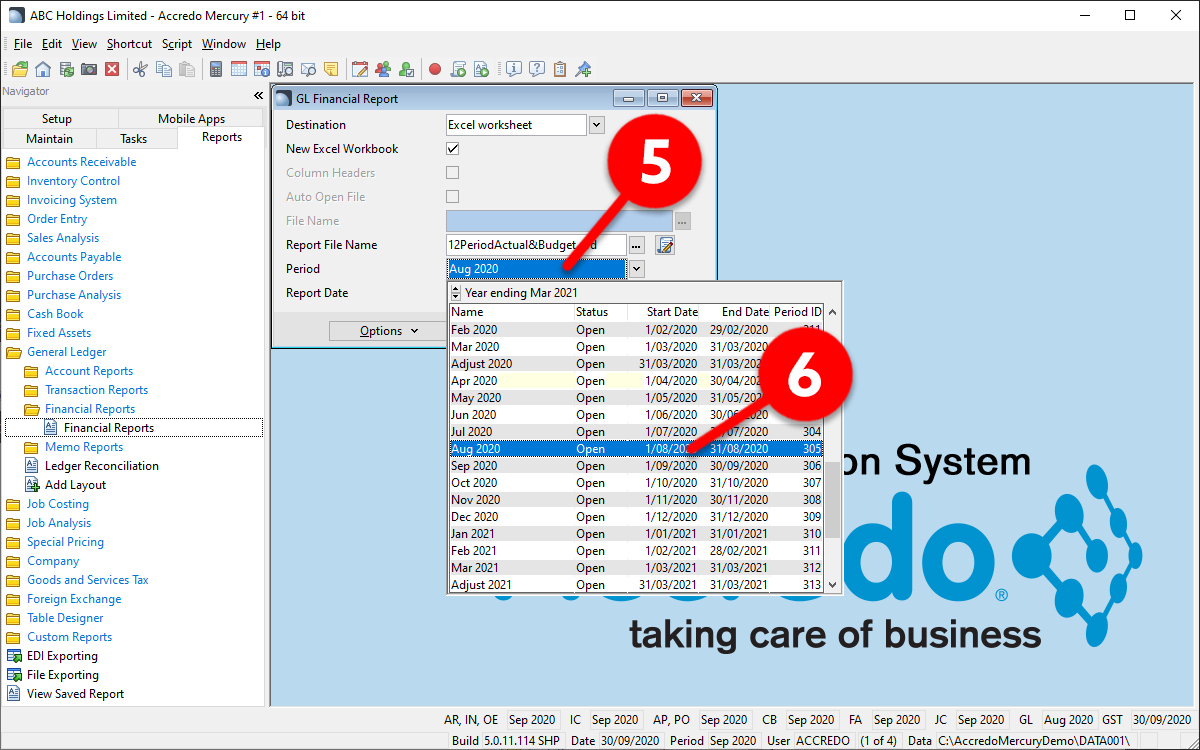
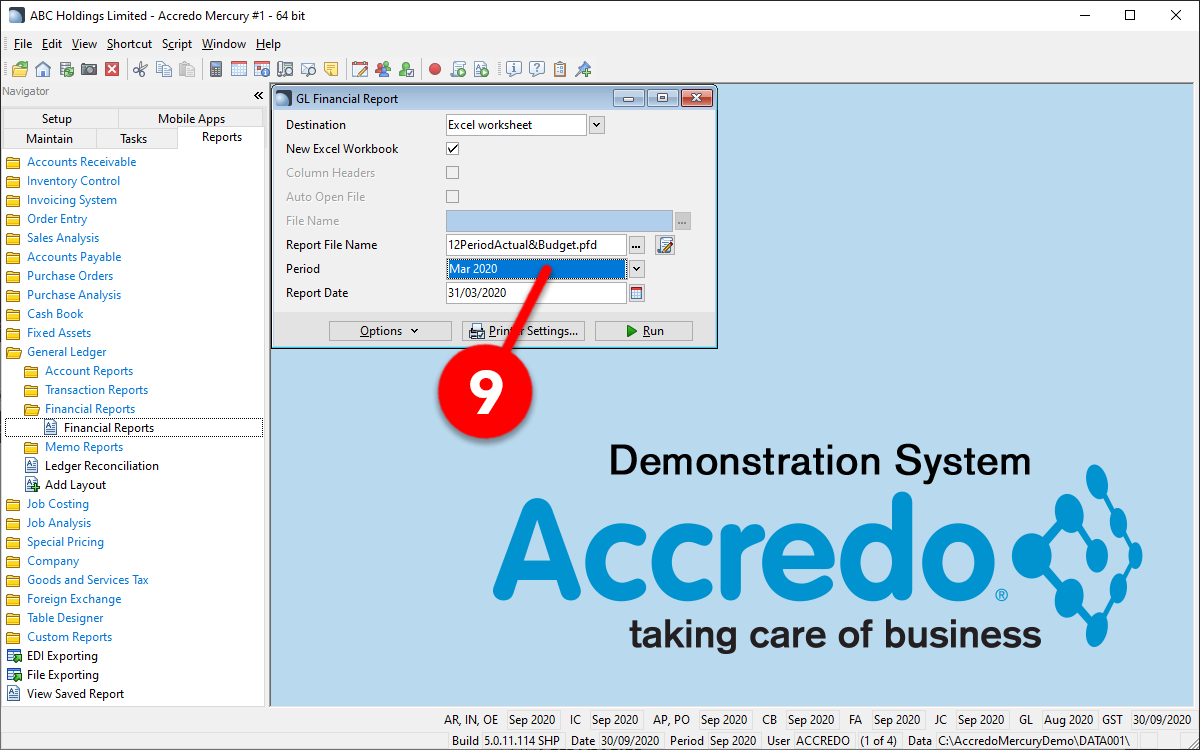
Once back in the GL Financial Report screen, for Period (5), select the PREVIOUS (not current) month. Do this by finding the right value in the drop-down list (6)
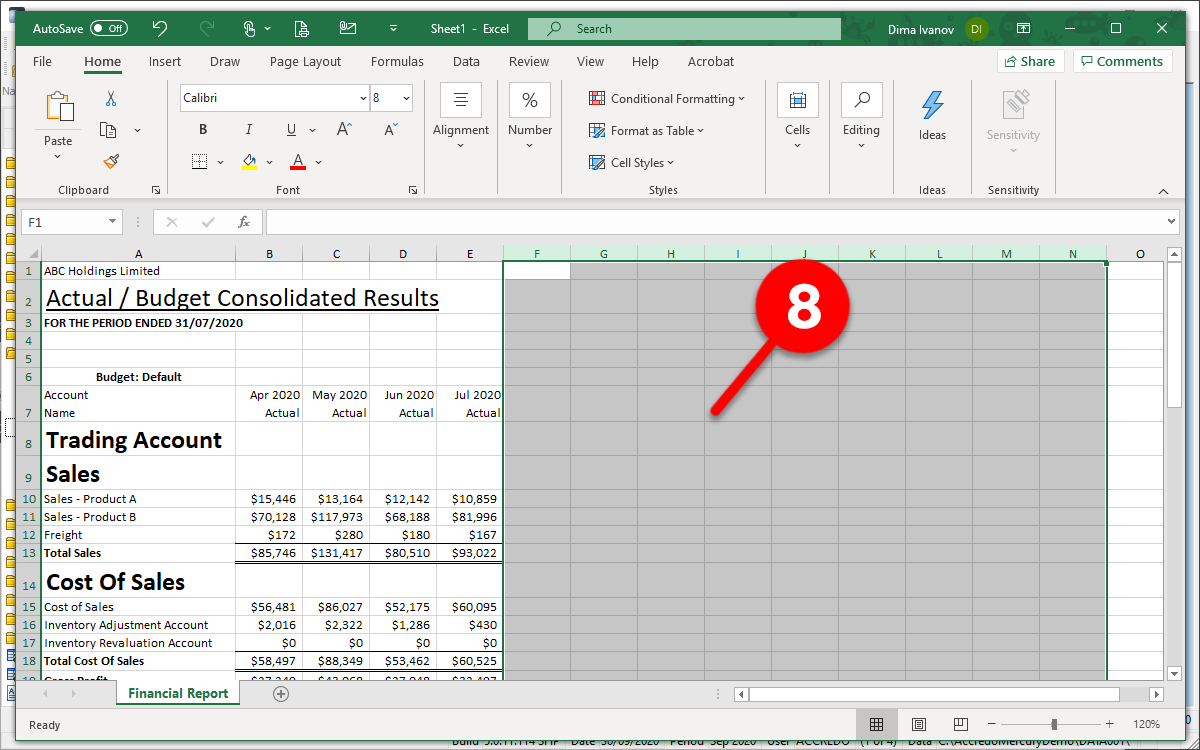
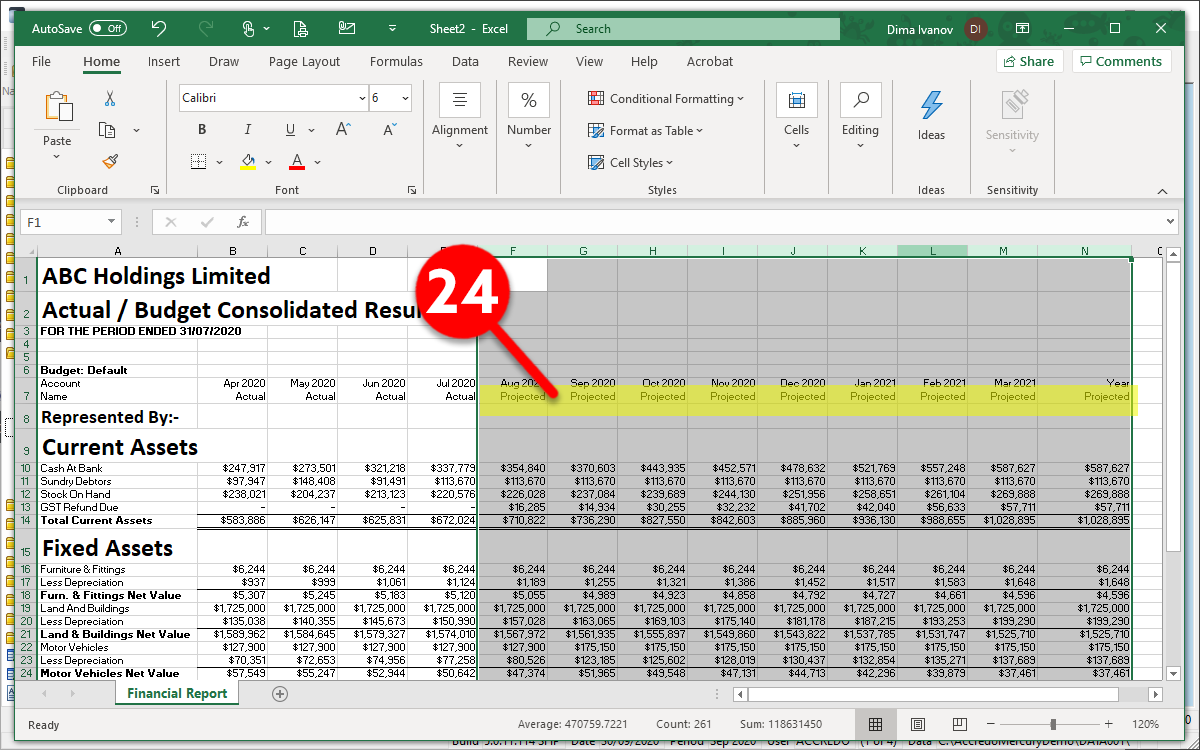
Click the Run button on the bottom right of the GL Financial Report screen (green triangle) – this action will open up a new Excel window on your computer – and the chances are, the file that opens will have some ACTUAL and some BUDGET columns for the current and any future months (7)
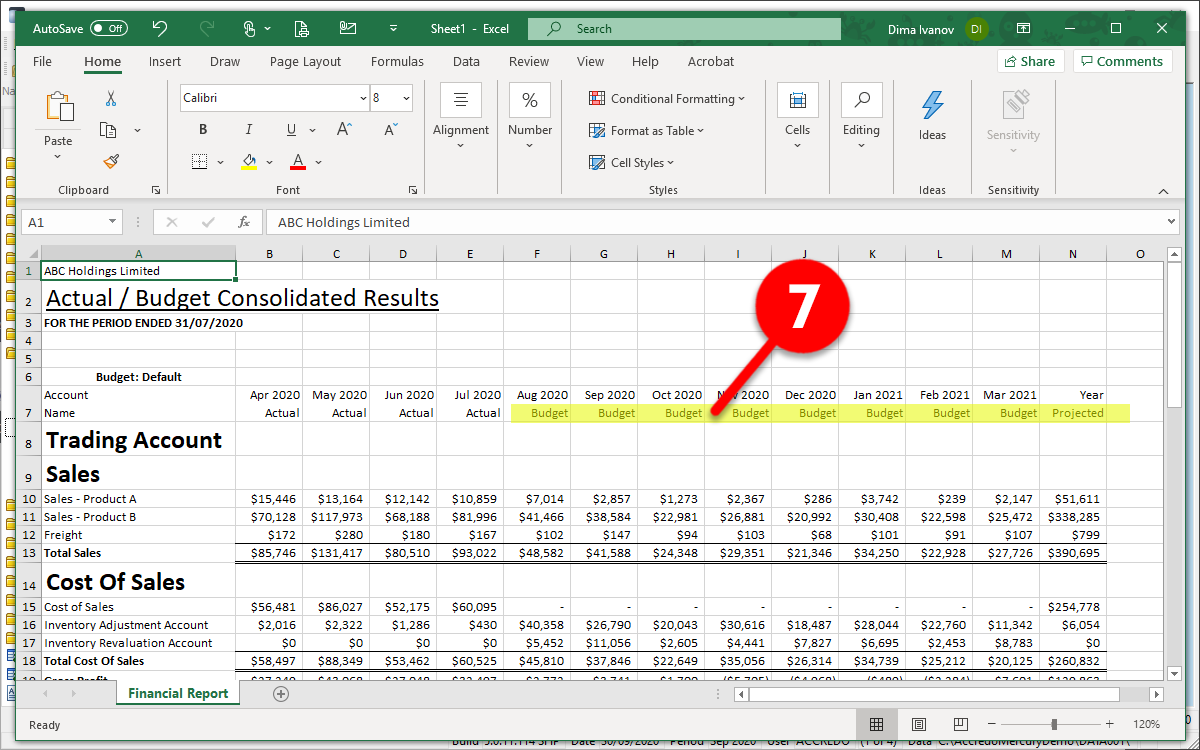
Please delete all of the BUDGET months (8), making sure that the last month you can see has already ended. Save the file on your computer, giving it a name that explains what file this is (e.g. P&L Apr20-Jul20) – you’ll be creating 4 files (may be just 2), so a good naming convention is vital
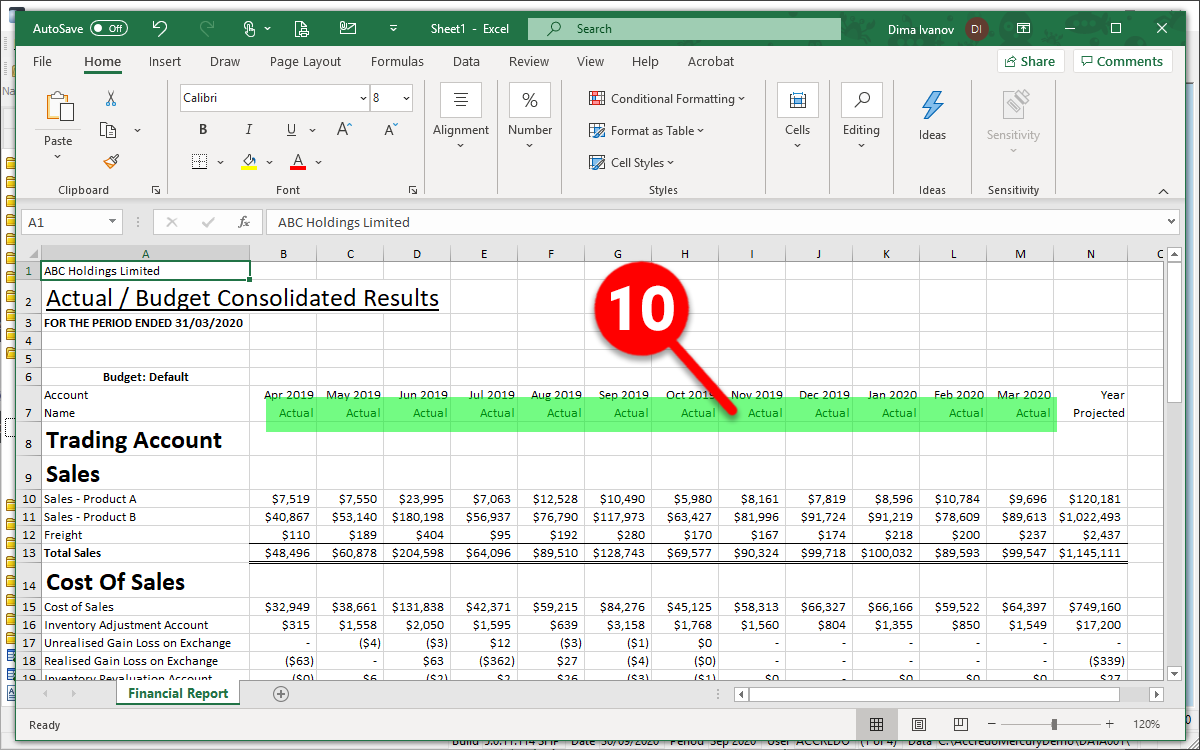
Once you have the first file saved, it’s time to repeat this same process (red circles 1 through to 4, above), but this time, select the final month of the previous financial year – in this example, it’s March 2020 (9)
In this file, all of the months should appear as ACTUAL (10). Double-check that they are, and then save this file also, using an appropriate naming convention
Feel free to click here to download a sample file to see if yours looks similar.
The above steps have generated 12 (most likely, more than 12) months of historical P&L data via one or two Excel files. Next, you need to do the same for the Balance Sheet.
Historical Balance Sheet
NB: If you already have a Report File for a 12-months export of the Balance Sheet – please use it in the same manner as the above Profit and Loss steps.
Once you’ve launched Accredo, click on the Reports tab, open the General Ledger folder, open the Financial Reports folder, and click on the Financial Reports screen (1). Once the GL Financial Report screen appears, select Excel worksheet in the top drop-down, check the New Excel Workbook option, and next to the Report File Name, click on the button with […] (2)
You may not have this exact option, but basically, you are looking for a report file that outputs 12 months worth of data. In our screenshot below, we can see the 12PeriodActual&Budget.pfd report (3). We select it, and click Open (4)
Once back in the GL Financial Report screen, for Period (5), select the PREVIOUS (not current) month. Do this by finding the right value in the drop-down list (6)
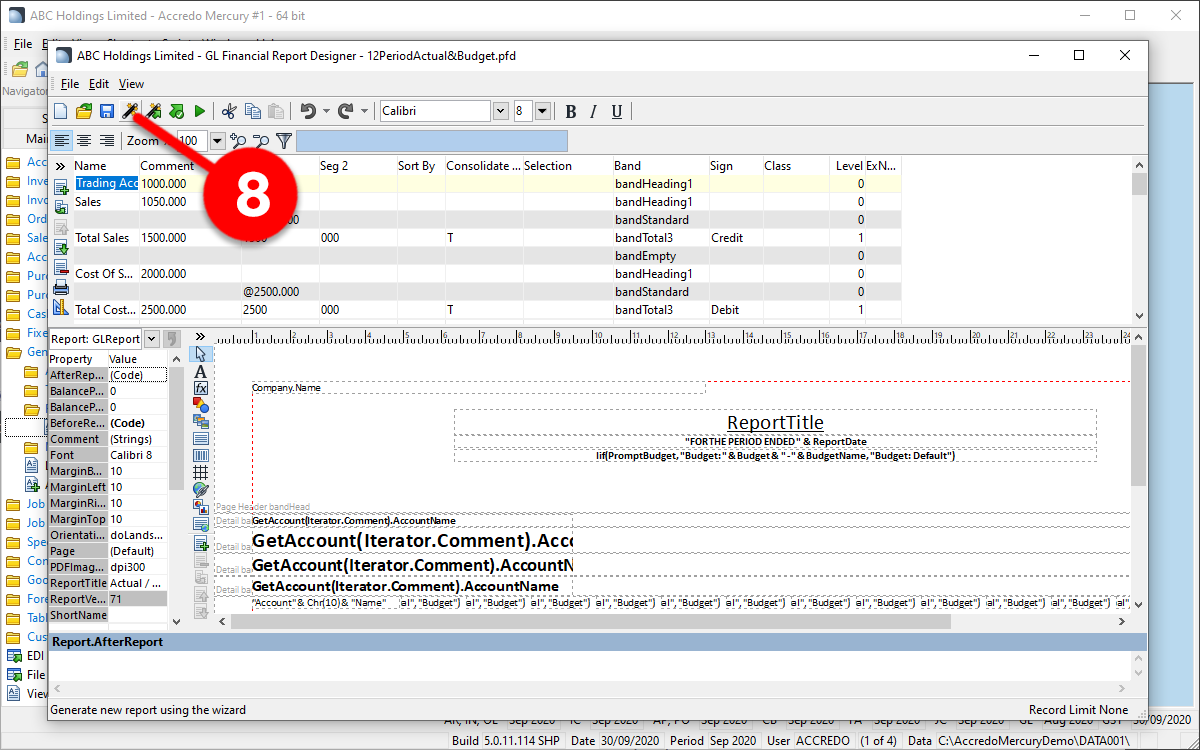
…but instead of clicking the Run button, click on the EDIT button to open the report designer (7) next to the […]
Once inside the report designer, click on the Generate new report using the wizard button (8)
Once the GL Design Wizard opens, click into the Account From field (9) and scroll or type to select 9100 (10) – this is the starting account for the Balance Sheet.
NB: The GL Account Codes specified below are for demo purposes only, and you may need to select different first and/or last P&L and/or Balance Sheet GL Account Codes to suit your GL chart structure.
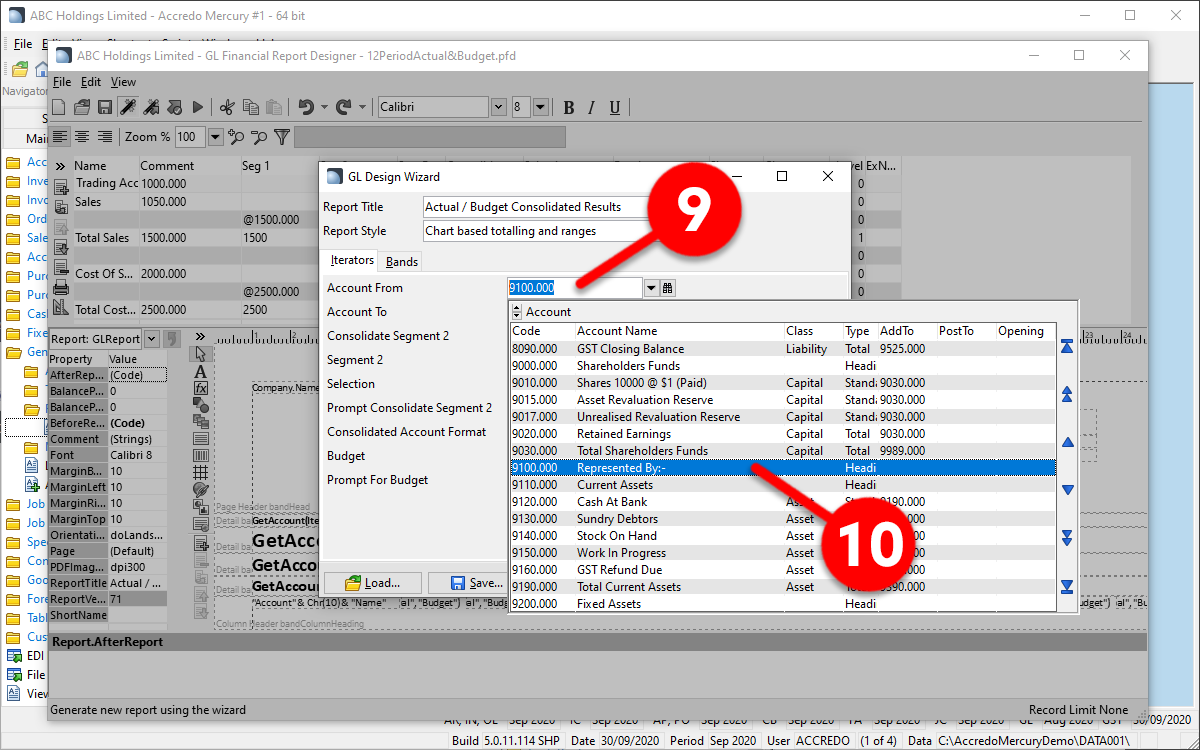
Once Account From is set to 9100, delete the value in Account To and leave it blank (11), unless it was already blank of-course. Click the green-triangle Generate button on the bottom-right of the GL Design Wizard:

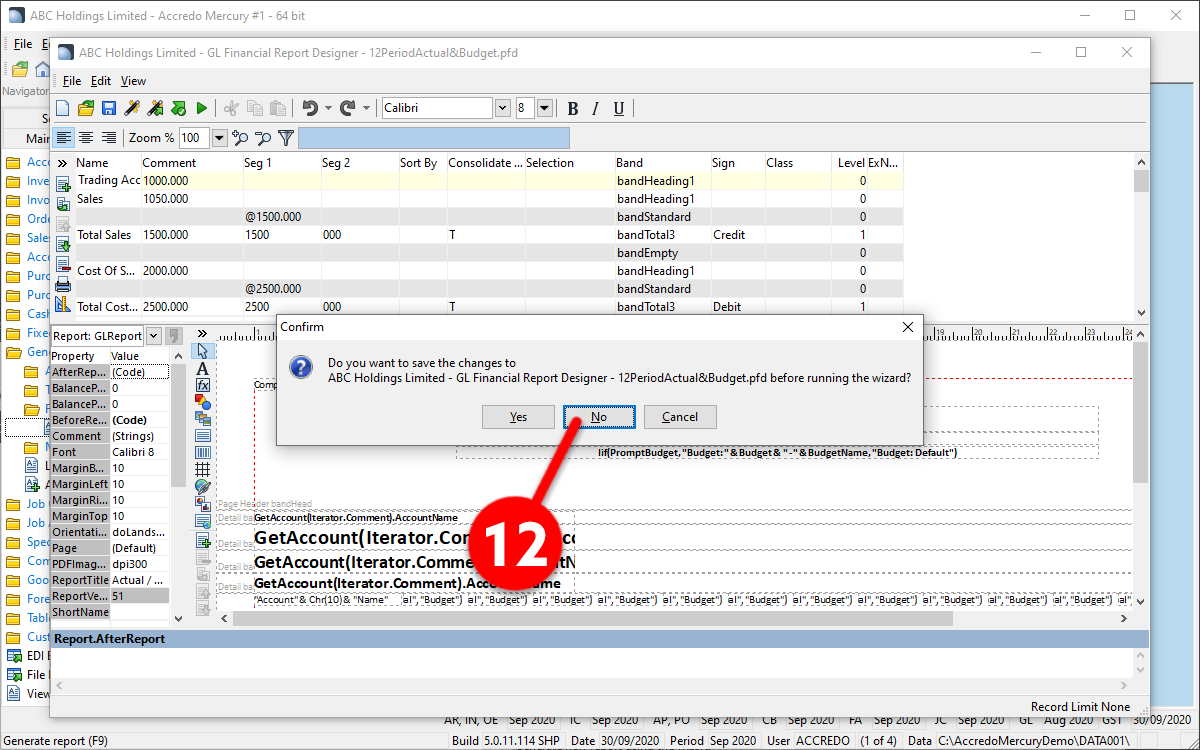
You may be asked the following question: Do you want to save changes to …… – make sure you click No (12) so that you create a new report file, rather than replacing an existing report file
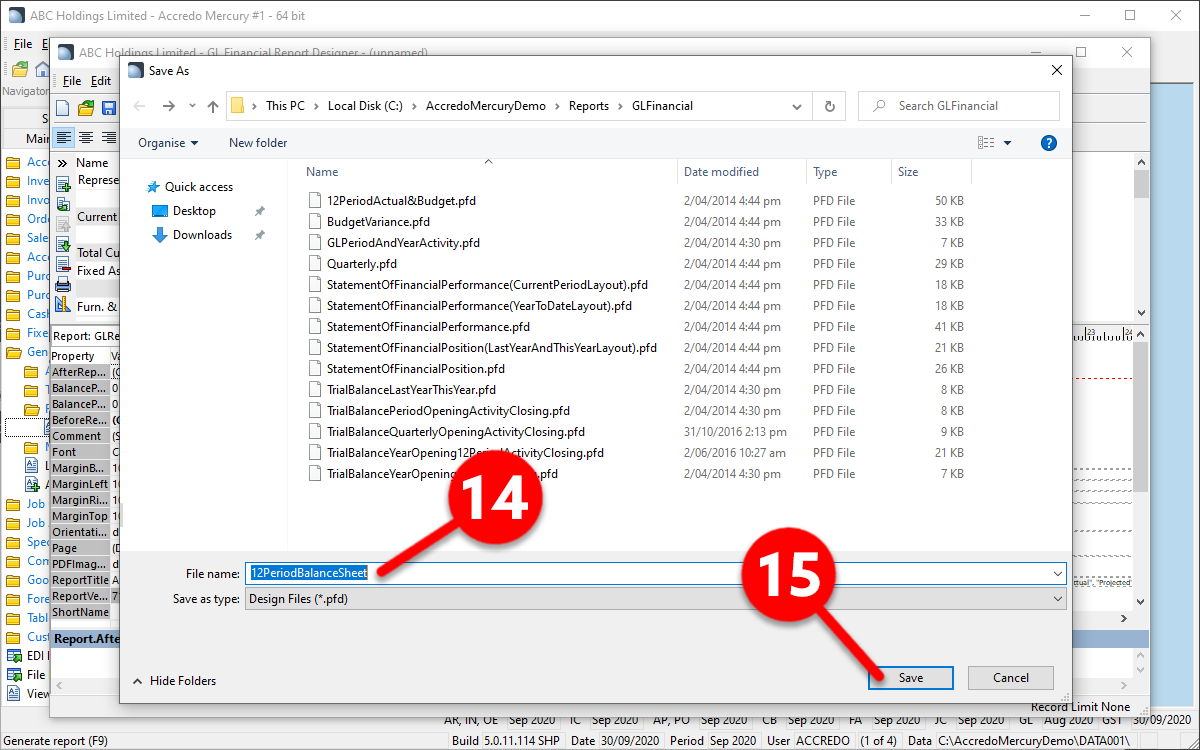
Click on File (13) and choose Save As
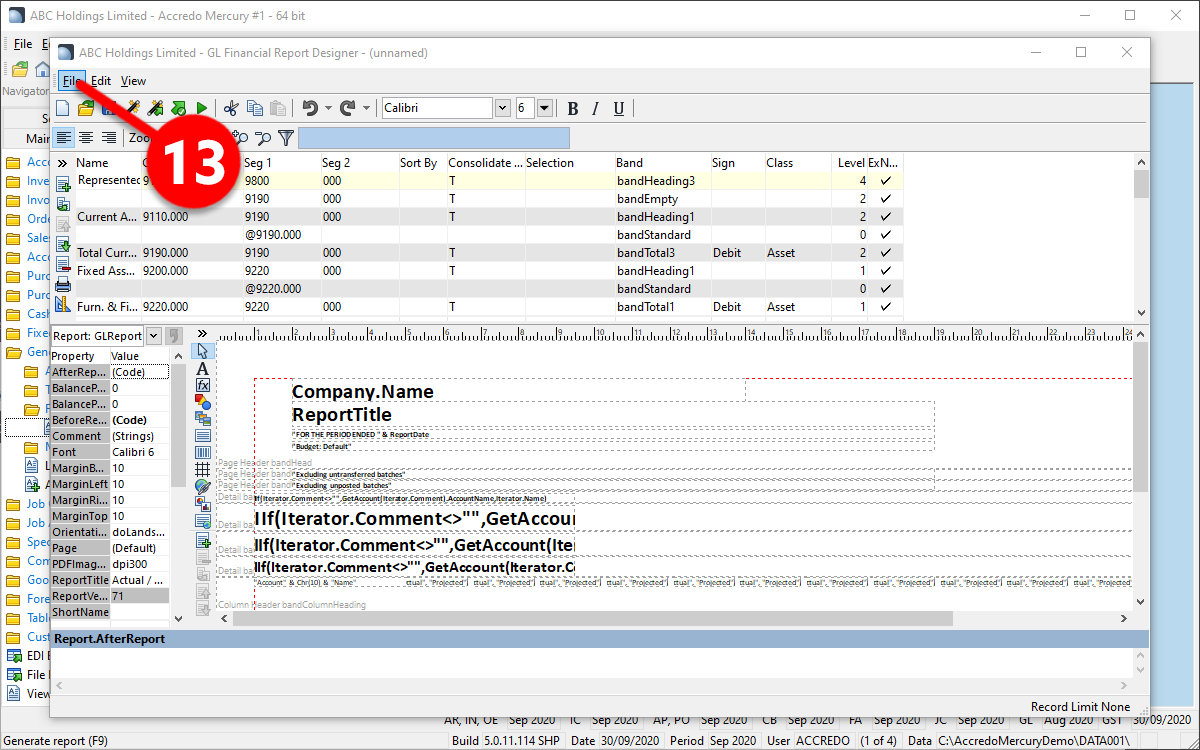
In the Save As dialogue, call this new 12 months balance sheet report file a name that you will recognise (14) and click Save (15)
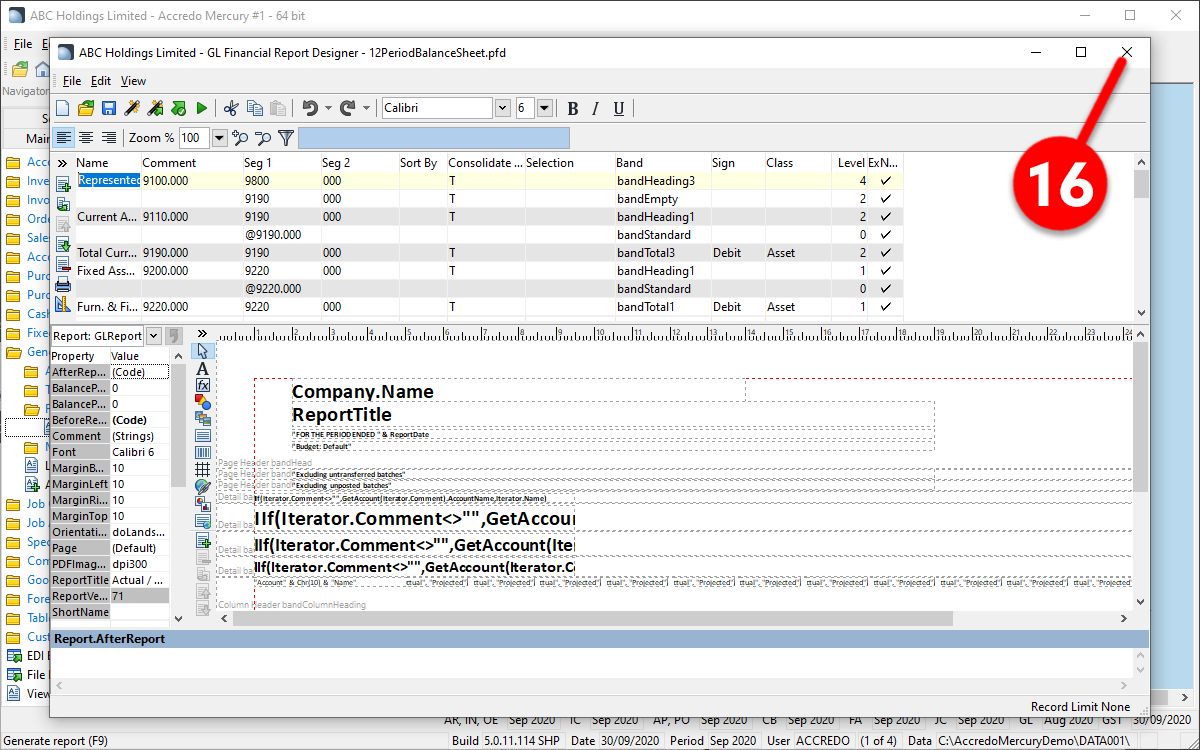
Once saved, close the Report Designer (16)
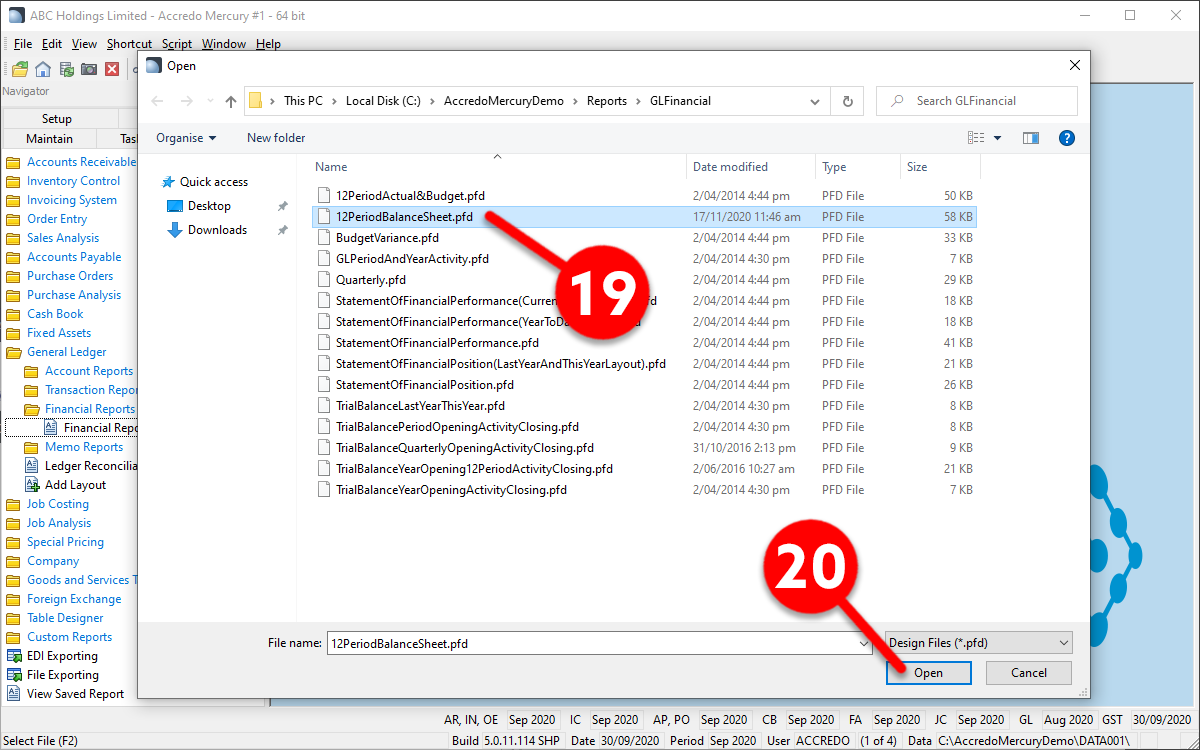
You’ll land back in the main interface. Once again, click on Financial Reports screen (17), and next to the Report File Name, click on the button with […] (18)

Once you click to select a Report File Name, you’ll see your newly created report file available for selection. Select it (19) and click Open (20)
You’ll see the new 12 months balance sheet report file show up (21), and as with the Profit and Loss we exported at the start, make sure you select the PREVIOUS month in the Period selector (22) and click Run (23)
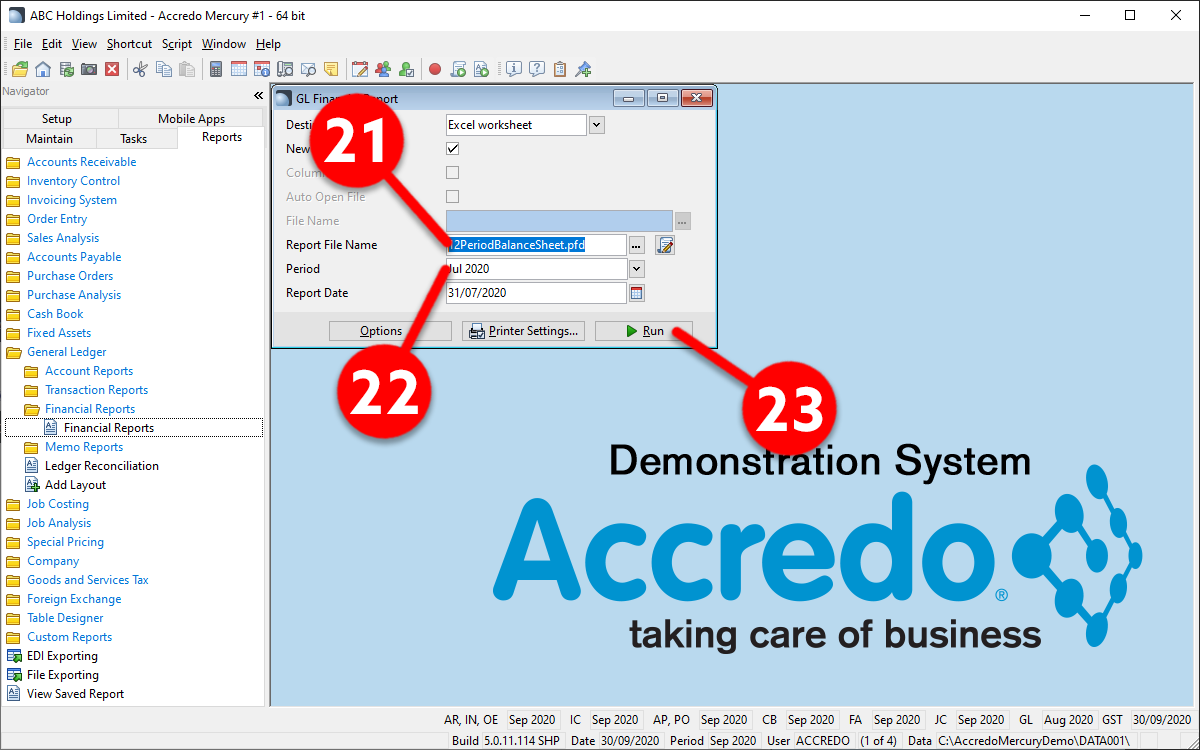
Running this report will generate (most likely) a mix of ACTUAL and PROJECTED data (24) – as with the Profit and Loss, please delete all of the PROJECTED months
And lastly – please remember to re-run the 12-months balance sheet report by selecting the final month of the previous financial year. Repeat Balance Sheet steps 17 to 23 as above, but make sure to select the last month of the previous financial year in step 22.
Feel free to click here to download a sample file to see if yours looks similar.
In the end, you will most likely have 4 files with historical data:
- Current financial year P&L, with all Budget columns deleted, thus, containing data ONLY for the completed months
- Previous financial year P&L with 12 months worth of data
- Current financial year Balance Sheet, with all Projected columns deleted, thus containing data ONLY for the completed months
- Previous financial year Balance Sheet with 12 months worth of data
When you get to uploading these files into KPI Works, you’ll simply load them in two batches.
Historical invoice count
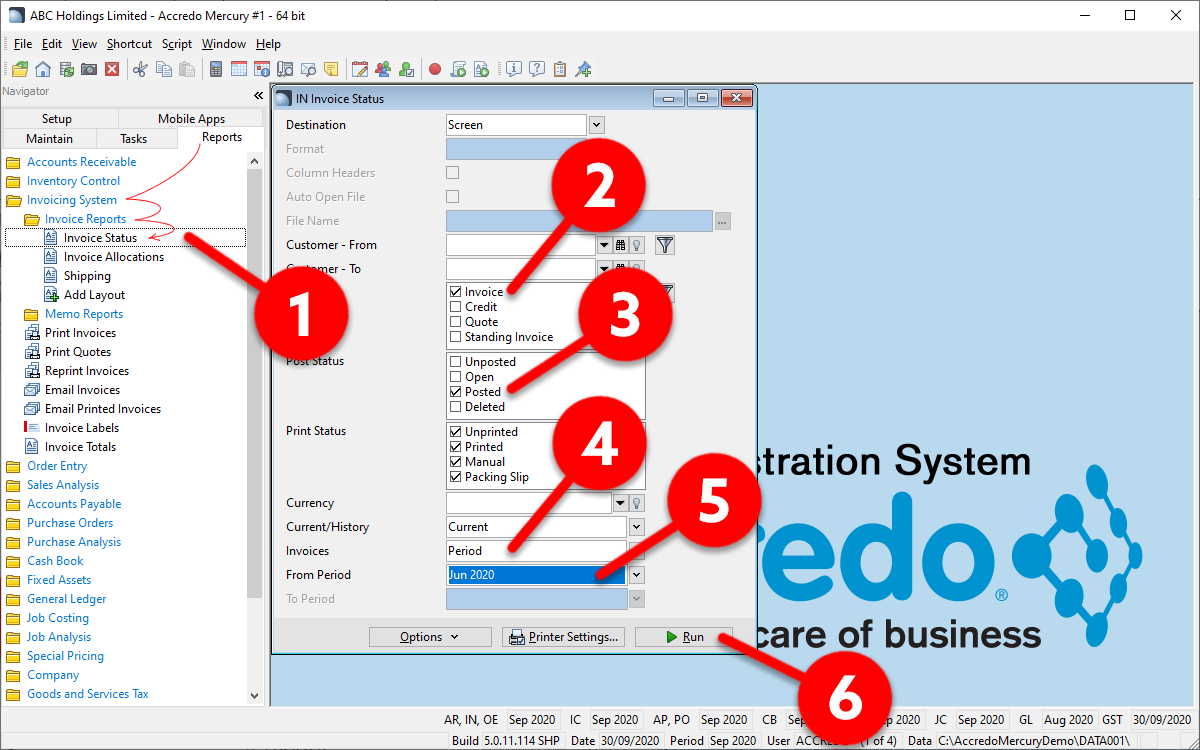
Once you’ve launched Accredo, click on the Reports tab, open the Invoicing System folder, open the Invoice Reports folder, and click on the Invoice Status screen (1). In Type, make sure only Invoice is checked (2), in Post Status make sure only Posted is checked (3), in Invoices choose Period (4) and in From Period choose the month you would like to count your invoices for (5). Finally, click Run (6)
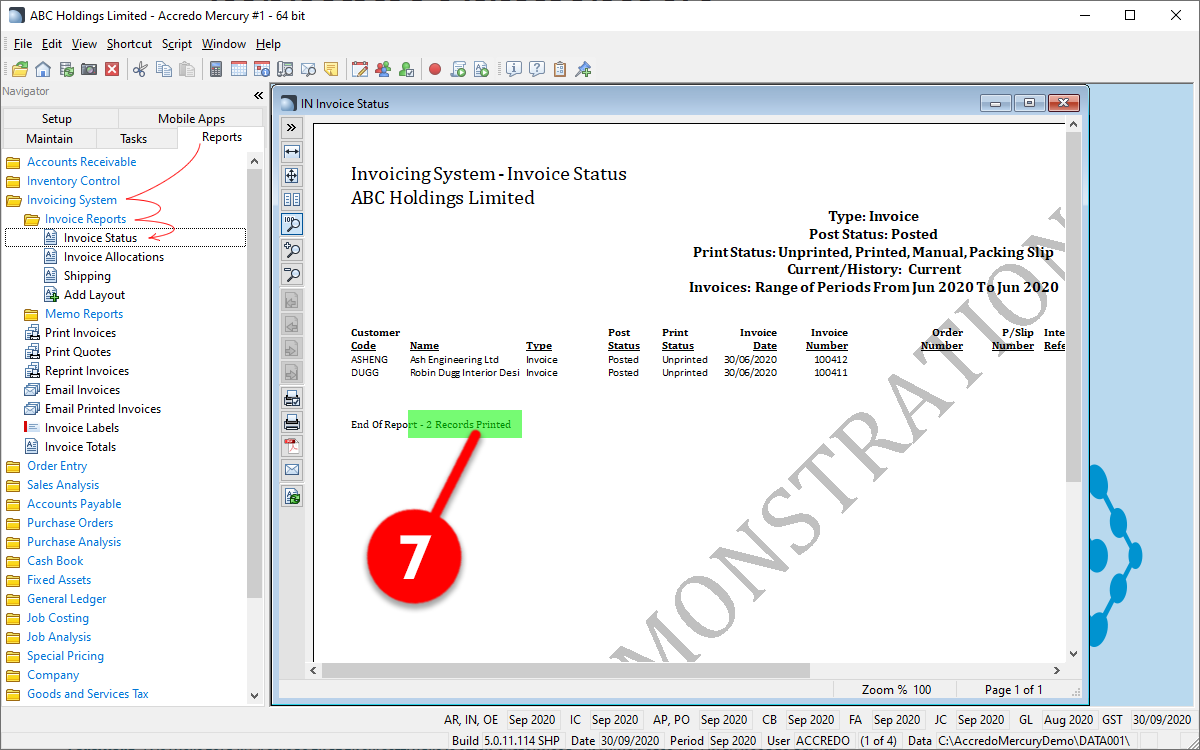
The count of unique invoices raised during the month will be at the end of the report and is defined as # Records Printed (7)
Why we ask for historical data
Just in case you’re curious about “Why do you guys ask for our historical data?”, please watch this short 1-minute video: